How to Convert MTS to ProRes on Mac(Yosemite/Mavericks)
When import and edit MTS videos with Final Cut Pro, you would usually run into incompatibility issue. Many users are having a hell of a time trying to find a way to convert MTS to ProRes, a lossy video compression format, which is ideal for Final Cut Pro editing. This article just aims to explain why we need transcode MTS to ProRes video and then present you a lossless MTS to ProRes conversion with the help of a professional MTS converter program.
Why convert MTS to ProRes?
The basic reason is that MTS format is highly compressed by H.264 codec, which is very hard to deal with during video editing. Plus, FCP still can't handle 1080 60p/50p footage well. What's more, if you got a corrupted AVCHD structure, the only solution to importing MTS to Final Cut Pro is to convert MTS files to ProRes as FCP can't recognize single MTS, M2TS video.
How to transcode MTS to ProRes with least quality loss?
As known to all, every time you make a conversion, you will loss a generation and degrade the video quality. Well, if you get a professional MTS converting tool, it will avoid heavy loss and keep the original quality as possible as it can. Here Brorsoft iMedia Converter for Mac is highly recommended to you.
Overall, the program is the best MTS Converter for Canon/Panasonic/Sony/JVC MTS footage. With it, you can effortlessly transcode MTS files to ProRes 422, ProRes 422 HQ, ProRes 422 LT, ProRes 444, which will create a Final Cut Pro X or FCP 7 friendly file format keeping the original quality. Besides FCP, this software can also export DNxHD for Avid, MPEG-2 for Adobe Premiere Pro, Premiere Element, Apple InterMediate Codec for iMovie, FCE and more NLE systems for native editing. Just download it and follow the tutorial below to get the work done.
Download the best Mac MTS Converter:
 (Note: Click here for OS X 10.5)
Step-by-step guide on MTS to ProRes conversion:
Step 1: Add MTS video files
Install and launch the MTS to ProRes Converter and load source MTS clips to it. You can batch convert multiple .mts clips as you want.
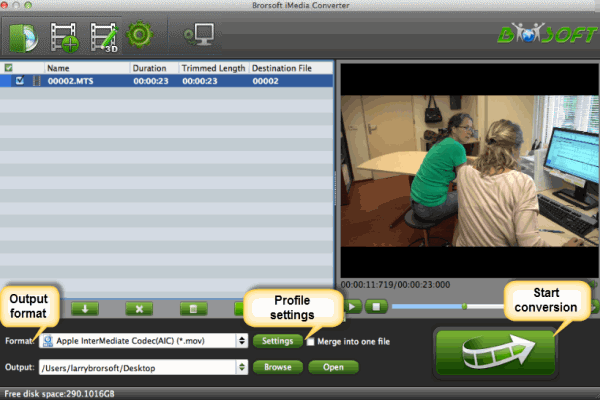
Step 2: Choose output format
Press the Format box and select one of the Apple ProRes codecs like "Apple ProRes 422 (*.mov), "Apple ProRes 422 (HQ) (*.mov)", "Apple ProRes 422(LT) (*.mov)", "Apple ProRes 422 (Proxy)(*.mov)", "Apple ProRes 444 (*.mov)" from the dropdown list.
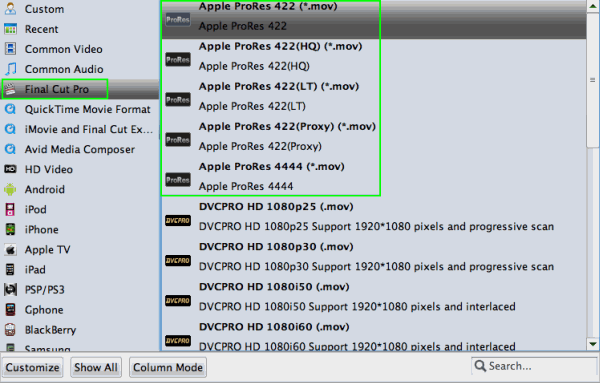
Tip: ProRes files are larger, but that's just the nature of the beast. You'd better choose a ProRes codec that is close to the bitrate of the camera codec. Remember the better the codec, the larger the file and the more CPU power and more importantly disc speed you'll need to edit it.
Step 3: Profile Settings:
In case the default settings do not fit your requirement, you can click "Settings" button and enter "Profile Settings" panel to adjust video size, bit rate, frame rate, sample rate and audio channels. Usually 1920*1080 video size and 30fps frame rate are recommended.
Step 4: Start MTS to ProRes conversion
Click "Convert" button to start transcoding MTS fiiles to ProRes on Mac(Yosemite/Mavericks) for importing to Final Cut Pro. When the conversion task is finished, click "Open" button to get the exported files and then import the converted MTS files into FCP 7/X to do further editing without any issue.
Related Products
iMedia Converter for Mac


Useful Tips
- MTS to iMovie
- MTS to ProRes MOV
- Convert MTS to MOV
- MTS to Premiere Pro
- MXF to Avid MC
- Convert WMV to iTunes
- Convert WMV to iMovie
- Convert WMV to FCP
- Convert WMV to DVD Player
- play wmv2 in quictime
- BDMV to iMovie
- DVD to iMovie
- MP4 to iMovie
- MOV to iMovie
- iMovie Support Video Formats
- MPEG to iMovie
- WMV to iMovie
- VOB to iMovie
- MKV to iMovie
- Zoom Q2n Videos to FCPX/iMovie
- Final Cut Pro 7 Tutorial
- MOV to Final Cut Pro
- BDMV to Final Cut Pro
- MP4 to Final Cut Pro
- WMV to Final Cut Pro
- Import/Rip Blu-ray to Final Cut Pro
- MKV to Final Cut Pro
- ISO to Final Cut Pro
- VOB to Final Cut Pro
- MPG to Final Cut Pro
- FLV to Final Cut Pro
- Video_TS to Final Cut Pro
- MTS to Final Cut Pro
- 4K XAVC to Final Cut Pro
- Edit Panasonic AVCHD in FCPX 10.4
- Edit Videos/Blu-ray/DVD in FCPX 10.4
- DVD to Camtasia Studio
- Video_TS/ISO to Camtasia Studio
- MP4 to Camtasia Studio
- MOV to Camtasia Studio
FCP Related Guides
iMovie Guides:
FCP Guides:
Camtasia Studio Tips:
Social Connection
Copyright © Brorsoft Studio. All Rights Reserved.