How to Convert BDMV files for Editing in Final Cut Pro
Final Cut Pro is one of the best non-linear video editing software. If you're using Final Cut Pro, you must have come across some video incompatibility problems since FCP supported video formats are quite limited and lots of video file types are not supported. In the following paragraphs, we will talk about how to import BDMV files to Final Cut Pro for editing. For those who are stuck in the BDMV to FCP X/7/6 incompatible issues, just read on to get rid of the trouble.
As we know, a BDMV may refer to a Blu-ray movie folder with MTS/M2TS extensions or a BDMV folder from AVCHD camera recorders. Neither of them can be supported by Final Cut Pro well(even the latest FCP X). To import BDMV to Final Cut Pro for editing, you'll need to convert BDMV files to Final Cut Pro friendly video formats and Apple ProRes is the best choice.
Here Brorsoft iMedia Converter for Mac is strongly recommended to help you convert BDMV files for Final Cut Pro on Mac OS X (El Capitan, Yosemite included) without quality loss. Besides FCP, this Mac BDMV converter can transcode BDMV files for smoothly editing in Premiere Pro, Avid Media Composer, iMovie, Adobe After Effects and more NLE systems. Click the Download button below to download the program and follow the steps to import BDMV file to Final Cut Pro with ease.
Download BDMV converter for Mac:
 (Note: Click here for OS X 10.5)
How to Convert and import BDMV to FCP on Mac
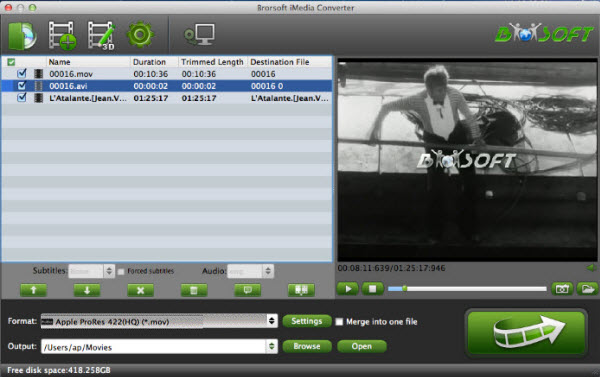
1. Import BDMV video files
Install and run the BDMV to FCP converter app. Then click Add button to load the .mts or .m2ts videos you want to convert for FCP. Or simply drag the videos to the item bar for conversion.
2. Choose ProRes as output format
Click Format bar and go to Final Cut Pro column by choosing "Apple ProRes 422 (*.mov)" as best video format for editing BDMV clips in Final Cut Pro with good video quality.
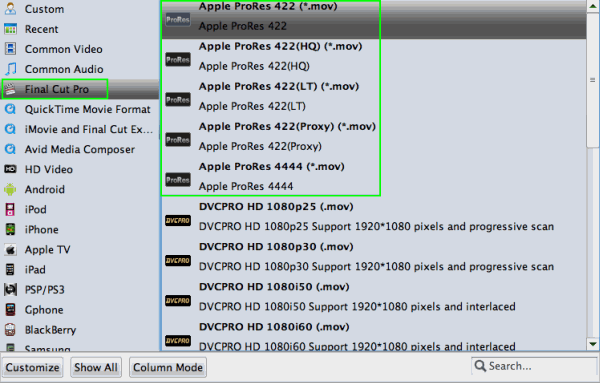
Tip: In case the default settings do not fit your requirement, you can click "Settings" button and enter "Profile Settings" panel to adjust video size, bit rate, frame rate, sample rate and audio channels.
3. Start BDMV to FCP conversion
Click "Convert" button to start transcoding BDMV files to ProRes for importing to FCP.
When the conversion task is finished, click "Open" button to get the exported files and then import the converted BDMV files into Final Cut Pro X or FCP 6/7 to do further editing without any issue.
Related Products
iMedia Converter for Mac


Useful Tips
- Convert WMV to iTunes
- Convert WMV to iMovie
- Convert WMV to FCP
- Convert WMV to DVD Player
- play wmv2 in quictime
- BDMV to iMovie
- DVD to iMovie
- MP4 to iMovie
- MOV to iMovie
- iMovie Support Video Formats
- MPEG to iMovie
- WMV to iMovie
- VOB to iMovie
- MKV to iMovie
- Zoom Q2n Videos to FCPX/iMovie
- Final Cut Pro 7 Tutorial
- MOV to Final Cut Pro
- BDMV to Final Cut Pro
- MP4 to Final Cut Pro
- WMV to Final Cut Pro
- Import/Rip Blu-ray to Final Cut Pro
- MKV to Final Cut Pro
- ISO to Final Cut Pro
- VOB to Final Cut Pro
- MPG to Final Cut Pro
- FLV to Final Cut Pro
- Video_TS to Final Cut Pro
- MTS to Final Cut Pro
- 4K XAVC to Final Cut Pro
- Edit Videos/Blu-ray/DVD in FCPX 10.4
- DVD to Prmiere Pro
- ISO to Premiere Pro
- MKV to Premiere Pro
- TS files to Premiere Pro
- YouTube WebM to Premiere Pro/AE
- Edit Icecream Recordings in Premiere Pro CC
- Edit 4K Footage in Premiere Pro CC 2018
- Convert BDMV files on Mac
- Convert BDMV to MKV
- Import BDMV to iMovie
- Import BDMV to FCP
- Play BDMV on Samsung TV via USB
- Create MKV from BDMV Folder
- Convert BDMV to MP4
- Convert BDMV to MP4
iMovie Guides:
FCP Guides:
Premiere Pro Guides:
Convert BDMV Folder:
Social Connection
Copyright © Brorsoft Studio. All Rights Reserved.