3 methods to Transfer Voice Memos from iPhone to Windows Computer
You may use your iPhone to record interviews, songs and more. Generally, the iPhone's native Voice Memo app works great for simple access to the features you need. After recording something, you certainly don't want to delete the memo. While, you may also don't want to keep it on your device, taking up space. Instead, you can transfer voice memo from iPhone to computer for backup. If you are wondering how to move voice memos from iPhone(iPhone 4S/5S/6/6 Plus) to computer, we've got a quick tutorial to help you out.
Actually, exporting voice memos is a lot simpler than you may realize. In this article we will share you 3 ways to transfer Voice Memos from iPhone to your computer for backup or record keeping:
Method 1: How to Email a Voice Memo
Method 2: How to Sync voice memos with iTunes
Method 3: How to Transfer iPhone voice memos with iRefone
Method 1: How to email a Voice Memo
The first is quite simply to email Voice Memo to yourself. In the app select the recording you want to move, then tap on the Share icon in the left corner under the Play button. Now you have the option to send it as a Message or Mail. Choose Mail then fill in the relevant details and hit send.
Note: This solution is fine for the occasional memo, but if you have several that you want to do at once - or have long recordings whose files sizes are not inbox friendly - then a better solution is to use iTunes.
Method 2: How to Sync voice memos with iTunes
It requires you to connect your iPhone to iTunes. There is not much more after that. In the few steps listed below, we will show you how import voice memos into iTunes.
Step 1: Connect your iPhone to your computer.
Step 2:Open iTunes on your computer and select your device from the sidebar.
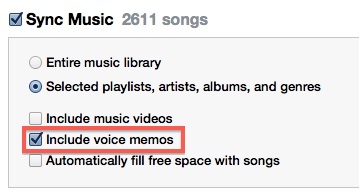
Step 3: Select "Music" from the tab options at the top of the screen.
Step 4: Select "Sync Music" and then select "Include voice memos." This setting will extract your voice memos and load them into iTunes.
Step 5: Click "Apply in the bottom right corner of iTunes. iTunes will then sync with your iPhone and download your voice memos to your computer.
Step 6: Once you've synced your voice memos with iTunes, they will be added as a specific category called, "Voice Memos." You can find them easily.
Note: As you know, sync data with iTunes always give you the whole restore, but not the extract data. Transferring Voice Memos from iPhone to computer via iTunes is not ideal if you just want to backup the voice memos not all the music list. In this case, you can choose the 3rd way- get help from an iOS data transfer tool.
Method 3: How to Transfer iPhone voice memos with iRefone
To copy voice memos from iPhone to PC easily and quickly, firstly you need to choose a perfect iOS data transfer tool that supports transferring many types of iOS data and files. Brorsoft iRefone is the tool you are looking for. With the help of iRefone, you can export any type of iOS data from iPhone/iPad/iPod to computer, such as Voice Memos, Photos, Messages, Contacts, Notes, Calendars, Reminders, Call history, Safari bookmarks and more. Anyway, whatever you want to transfer from iPhone to computer, Brorsoft iRefone helps you make it with a few clicks. Note that the process is exactly the same whether you own a Windows PC or a Mac. If you are on Mac OS X, you can turn to iRefone for Mac.


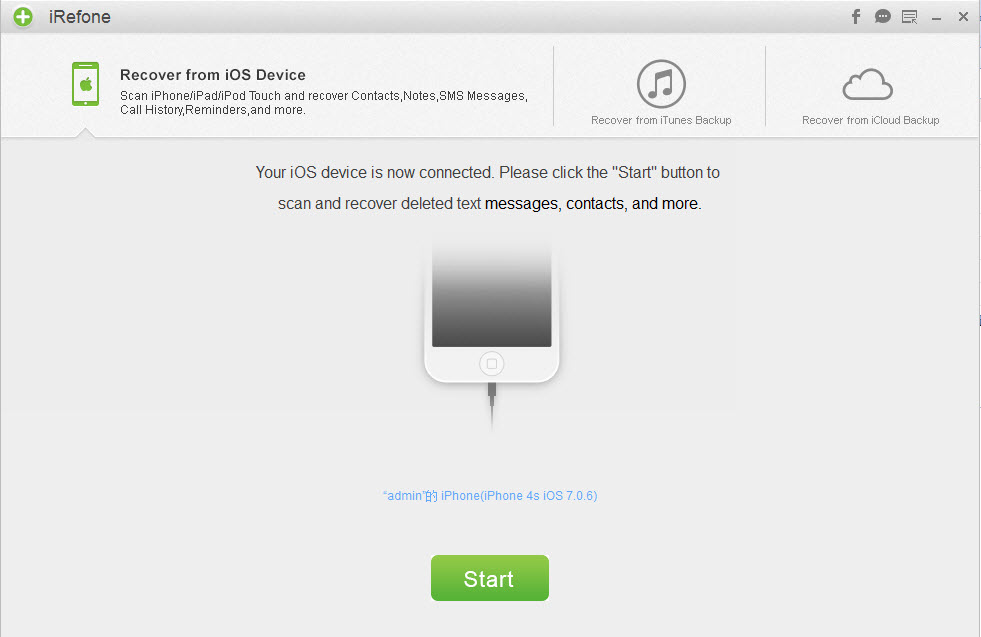
Step 1: Launch Brorsoft iRefone
Install and launch the iPhone data recovery program and then plug in your iPhone to your computer. Click "Start" after your iPhone is recognized by iRefone. In this way, you choose the recovery mode of "Recover from iOS Devices"
Tip: If you use an iPhone 4/3GS, you can also start the scanning of your device by clicking on the "Advanced Mode" button.
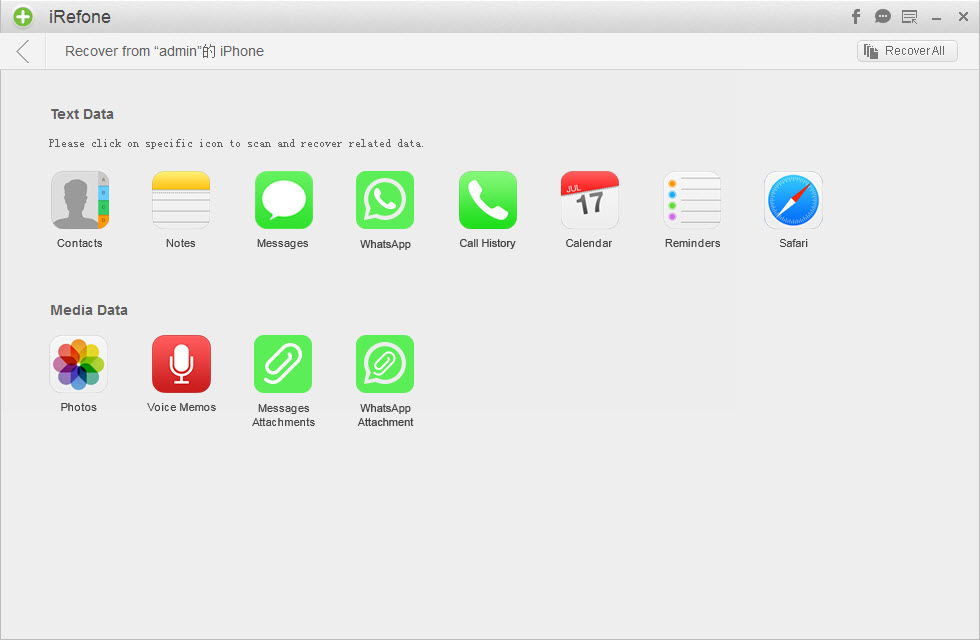
Step 2: Choose Voice Memo
Choose the Voice Memo among the data types supported by iRefone which includs Photos, Messages, Contacts, Notes, Calendars, Reminders, Call history by clicking on the icon of Voice Memo.
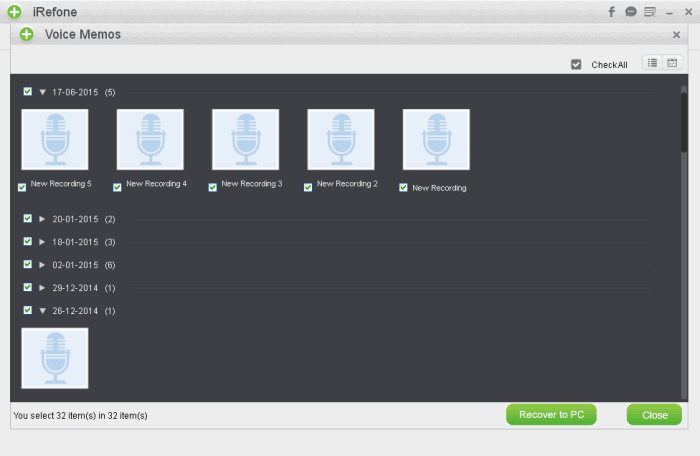
Step 3: Preview and Save to PC
Brorsoft iRefone will extract all the Voice Memos kept on your iPhone including the deleted or lost ones, so you can take time to make decision about what you want to transfer to your computer. And finally hit the button of "Recover to PC" to transfer the selected Voice Memo to your computer. Enjoy.
Related Products
iRefone
 Price: $45.95


Useful Tips
Social Connection
Copyright  2015 Brorsoft Studio. All Rights Reserved.
Copyright © 2009-2017 Brorsoft Studio. All Rights Reserved.