Learn 5 advanced iMovie editing Skills(Send iMovie Projects to FCP X included)
Welcome to iMovie 10! An iMovie project is where you assemble your clips and photos; and add titles, effects and transitions to create a video. If you already have a Mac, it's the simplest way to get started editing new video projects. This article, show you 5 advanced iMovie 10 editing. Let's study one by one.
1. iMovie 10 Video Effects
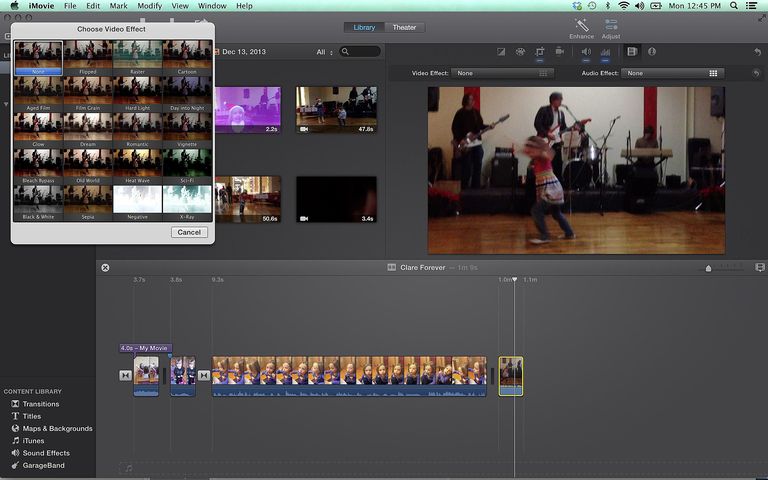
Editing in iMovie 10, you'll have lots of options for changing the way that your video footage looks. Under the adjust button (in the top right of the iMovie window) you'll see options for color balance, color correction, image cropping and stabilization. These are basic effects that you may want to consider adding to any video clip, just to make overall improvements to how it comes out of the camera. Or, for easy adjustments, try the Enhance button, which will apply automatic improvements to your video clips.
In addition, there's an entire video effects menu that can change your footage to black and white, add an old-movie look and more.
2. Fast and Slow Motion in iMovie 10
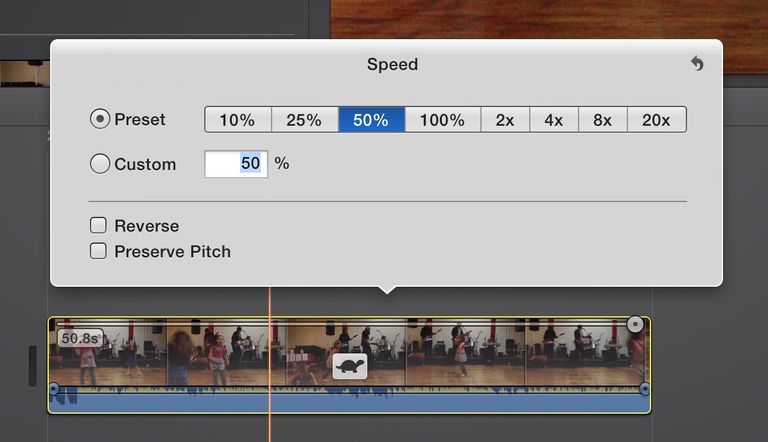
Adjusting the speed of your clips can really change the effect of your edited movie. Speed the clips up, and you can tell a long story or show a detailed process in a matter of seconds. Slow the clips down and you can add emotion and drama to any scene.
In iMovie 10 you adjust the speed of the clips through the Speed Editor. This tool offers preset selections for speed, and also gives you ability to reverse your clips. There's also a dragging tool at the top of any clip in the speed editor that you can use to adjust the length of a clip, and the speed will adjust appropriately.
In addition to slowing down, accelerating, and reversing clips, iMovie 10 makes it easy to add freeze frames or create instant replay from any part of your video. You can access these options through the Modify drop down menu at the top of the screen.
3. Precision Editing in iMovie 10
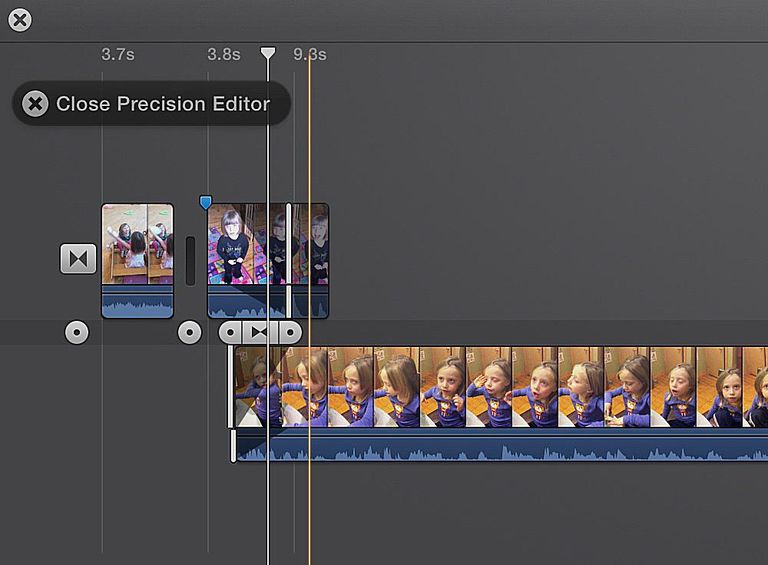
Most of the tools in iMovie 10 are designed to work automatically, and for the most part you'll have success just letting the program work its editing magic. But sometimes you want to be extra careful and apply precision to every frame of your video. If that's the case, you'll be happy to know about the iMovie precision editor!
With the precision editor, you can adjust the location and length or transitions in iMovie. It also lets you see the whole length of a clip, so you know how much you're leaving out, and you can easily adjust the part that is included.
You can access the iMovie precision editor by holding control while selecting a clip in your sequence, or through the Window drop down menu.
4. Overlapping Clips in iMovie
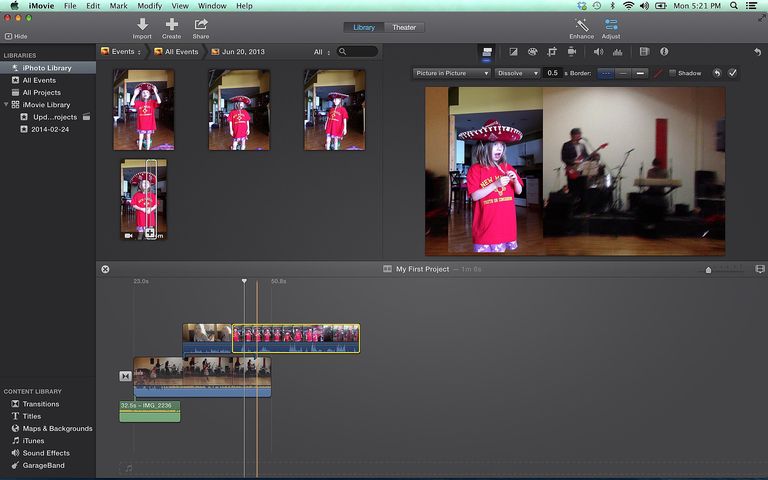
iMovie uses a trackless timeline, so you can stack clips two clips on top of each other in your editing sequence. When you do this, you'll see a menu with video overlay options, including picture-in-picture, cutaway, or blue/green screen editing. These options make it simple to add b-roll to a project and incorporate multiple camera angles.
5. Moving Between iMovie 10 and FCP X
iMovie is a great piece of software, but some users may want to upgrade to the professional features Final Cut Pro has to offer. If you're one of those users, don't worry. You can now easily move your iMovie movies and trailers to Final Cut Pro and start editing like a pro in no time.
Part I: Send an iMovie Movie to Final Cut Pro
To get started on sending an iMovie movie to Final Cut Pro, open iMovie and load the project you'd like to transfer into the timeline. Then go to File > Send Movie to Final Cut Pro.

iMovie will launch Final Cut Pro, create a new Final Cut Pro Library called iMovie Library, create a Final Cut Pro Event (with the same name as the iMovie Event your movie came from), and finally, load your movie into the Event as a Final Cut Pro project. Click on the project to load it in to the timeline. At this point, you can start editing your new project.
Part II: Send an iMovie Trailer to Final Cut Pro
iMovie allows you to quickly create cinematic trailers by filling out a "credits" text form and selecting short clips of video, which iMovie then compiles based on the template you selected. Because this process does not take place in a standard timeline, though, getting an iMovie trailer into Final Cut Pro requires an extra step.
To convert your trailer into a timeline-based movie, go to File > Convert Trailer to Movie.
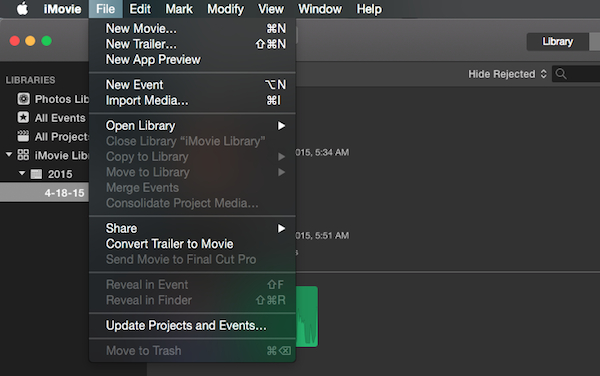
Once again, to send your movie to Final Cut Pro, go to File > Send Movie to Final Cut Pro.
Your iMovie trailer can now be edited as a Final Cut Pro project.
Addition Tip:
At present, no matter iMovie 11, iMovie 09 or iMovie 08, they only support a limited number of video formats, including DV, DVWidescreen, HDV 1080i (25 and 30 fbs), HDV 720p (25 and 30 fps), MPEG-4 Simple Profile, iSight. If you wanna to import 4K XAVC/XAVC, MXF, or MTS, SWF, MPG, MKV, AVI, WMV or even DVD and Blu-ray Disc movies to edit with iMovie, we will need to convert these files to iMovie supporting formats and then successfully import them into iMovie.
In this passage, we'd like to recommend a great iMovie converter named Brorsoft Video Converter Ultimate (for Windows) | iMedia Converter (for Mac), all-in-one Blu-ray Ripper, DVD Ripper and HD Video Converter, designed for video format conversion, thus having excellent performance in converting all videos to iMovie. After converted, there is no quality loss. The green environment will never bother you with unexpectedly popping up advertisements, commercial software, etc.
More conveniently, this BD/DVD/HD Video to iMovie converter has quite simple operation, and even the beginners can handle it. Now, let's Download it and import your videos into iMovie for editing.


Rip, backup and edit Blu-ray/DVD/HD Videos with Brorsoft Video Converter Ultimate, Tutorial page >>
For Mac users, please turn to iMedia Converter for Mac Tutorial page >>
Money Saving Tips: Mail to: support@brorsoft.com to get an EXTRA $5.00 COUPON
Related Products
iMedia Converter for Mac


Useful Tips
- BDMV to iMovie
- Video_TS to iMovie
- DVD to iMovie
- MP4 to iMovie
- MOV to iMovie
- iMovie Support Video Formats
- MPEG to iMovie
- WMV to iMovie
- VOB to iMovie
- MKV to iMovie
- Import Blu-ray to iMovie
- Send iMovie Projects to FCP X
- Convert WMV to iTunes
- Convert WMV to iMovie
- Convert WMV to FCP
- Convert WMV to DVD Player
- play wmv2 in quictime
- BDMV to iMovie
- DVD to iMovie
- MP4 to iMovie
- MOV to iMovie
- iMovie Support Video Formats
- MPEG to iMovie
- WMV to iMovie
- VOB to iMovie
- MKV to iMovie
- Zoom Q2n Videos to FCPX/iMovie
- Final Cut Pro 7 Tutorial
- MOV to Final Cut Pro
- BDMV to Final Cut Pro
- MP4 to Final Cut Pro
- WMV to Final Cut Pro
- Import/Rip Blu-ray to Final Cut Pro
- MKV to Final Cut Pro
- ISO to Final Cut Pro
- VOB to Final Cut Pro
- MPG to Final Cut Pro
- FLV to Final Cut Pro
- Video_TS to Final Cut Pro
- MTS to Final Cut Pro
- 4K XAVC to Final Cut Pro
- Edit Videos/Blu-ray/DVD in FCPX 10.4
- DVD to Prmiere Pro
- ISO to Premiere Pro
- MKV to Premiere Pro
- TS files to Premiere Pro
- YouTube WebM to Premiere Pro/AE
- Edit Icecream Recordings in Premiere Pro CC
- Edit 4K Footage in Premiere Pro CC 2018
- Import Blu-ray to Premiere Pro
- Import Blu-ray to Prmiere Elements
- DVD to Pinnacle Studio Editing
- DVD to Final Cut Pro
- DVD to iDVD
- DVD to iMovie 11
- DVD to Sony Vegas
- DVD to Adobe Premiere
- DVD to Avid Media Composer
- DVD to Premiere Elements
- DVD to CyberLink PowerDirector
- DVD to Sony Movie Studio
- DVD to DaVinci Resolve
- DVD to Windows Movie Maker
- DVD to PowerPoint
- Import DVD to Edius
- Import Video_TS to Final Cut Pro
- Import DVD to Lightworks Pro
- Import DVD to After Effects CC
- Edit Video_TS/ISO with Camtasia Studio
- Import DVD to Corel VideoStudio X10
- Import Blu-ray to iMovie
- Import Blu-ray to Premiere Pro
- Import Blu-ray to Prmiere Elements
- Import Blu-ray to PowerDirector
- Import Blu-ray files to Avid Media Composer
- Import Blu-ray to Pinnacle Studio 20
- FCP 7 Tutorial (Add Text, Titles)
- Get Your Footage Synced up with Pluraleyes
- Import Blu-ray files to Windows Movie Maker
- DVD to Camtasia Studio
- Video_TS/ISO to Camtasia Studio
- MP4 to Camtasia Studio
- MOV to Camtasia Studio
FCP Tips:
iMovie Guides:
FCP Guides:
Adobe Premiere Pro Tips:
DVD Editing Tips:
Blu-ray Editing Tips:
Camtasia Studio Tips:
Social Connection
Copyright © Brorsoft Studio. All Rights Reserved.