Installing Kodi on Android TV: Watching Any Blu-ray/DVD/Videos via Kodi Streamer
Kodi is a fantastic way to stream content to your TV from a computer or phone. Here's how you can get Kodi (Krypton) installed on your Android TV and start streaming your Blu-ray movies, DVD movies and any videos onto the big screen.
Installing Kodi the incredibly easy way:
1. Download the Kodi app to your Android TV.
2. Configure the Kodi app to see the content you have stored on the network.
3. Done.
Installing Kodi the long-winded way:
If, for some reason, you can't download Kodi from the Google Play Store, here’s another way to install it onto your Android TV device.
1. Go to Android TV’s “Settings” panel and scroll to “Security & Restrictions”.
2. Turn on “Unknown Sources” to allow for installation of apps outside of the Google Play Store.
3. Download Kodi for Android from Kodi’s download page – depending on your hardware, you need to select either the ARM or x86 version.
4. Copy the downloaded .apk file to Google Drive or a USB drive and plug it into your Android TV.
5. Navigate to where you saved the .apk file using ES File Explorer or any other file management app.
6. Open the .apk file to be asked if you’d like to install Kodi and select “Install”.
7. Once the file has finished transferring across to your device, you’ll be asked once again if you’d like to install Kodi. Select “Install”.
8. Kodi will install and work exactly as if it was downloaded from the Google Play Store.
9. Configure Kodi so you can see the content (Blu-ray movies, DVD movies and any videos) you have stored in the network.
10. Done.
Now you’re done installing Kodi, it’s time to stream the Blu-ray movies, DVD movies and any videos onto the big screen.
Okay, let's begin. First you should know what the file formats supported by Kodi, and then rip Blu-ray to that format:
Kodi supported formats list as below:
| Container formats: AVI, MPEG, WMV, ASF, FLV, MKV/MKA (Matroska), QuickTime, MP4, M4A, AAC, Ogg, OGM, RealMedia RAM/RM/RV/RA/RMVB, 3gp. |
| Video formats: MPEG-1, MPEG-2, H.263, MPEG-4 SP and ASP, MPEG-4 AVC (H.264), H.265 (as from Kodi 14) HuffYUV, MJPEG, RealVideo, RMVB, WMV . |
| Audio formats: MIDI, AIFF, WAV/WAVE, AIFF, MP2, MP3, AAC, DTS, ALAC, AMR, FLAC, RealAudio, WMA. |
| 3D video formats: Passive 3D video formats such as SBS, TAB, anaglyph or interlaced. |
Clike here to get more plex supported & unsupported media format.
Rip Blu-ray/DVD and any videos to Kodi (XMBC) supported format:
This is an easy task. With Brorsoft Video Converter Ultimate (for Windows) | iMedia Converter (for Mac), you can copy Blu-ray/DVD, directly copy Blu-ray/DVD and transcode Blu-ray/DVD/any videos to common MP4, AVI, MOV format supported by Kodi. Each way of these can remove Blu-ray/DVD copy protection, encrypted Blu-ray/DVD to unencrypted one, to play Blu-ray/DVD on Kodi.
As Kodi supports different codec, such as H.263, H.264, H.265(as from Kodi 14), MPEG, Ultimate / iMedia allows you to rip the Blu-ray and DVD to that format and change any video to that codec for Kodi playback.
Rip Blu-ray/DVD/videos for playing on Android TV via Kodi
The trail-before-purchase version availabel for you, the watermark is the only limitation between the trial version and full version. Here in this article, Windows version screenshots were taken as example, the Mac version shares the same steps, just keep in mind you have download the right version, Windows platform .exe files cannot be installed on macOS – and vice versa.


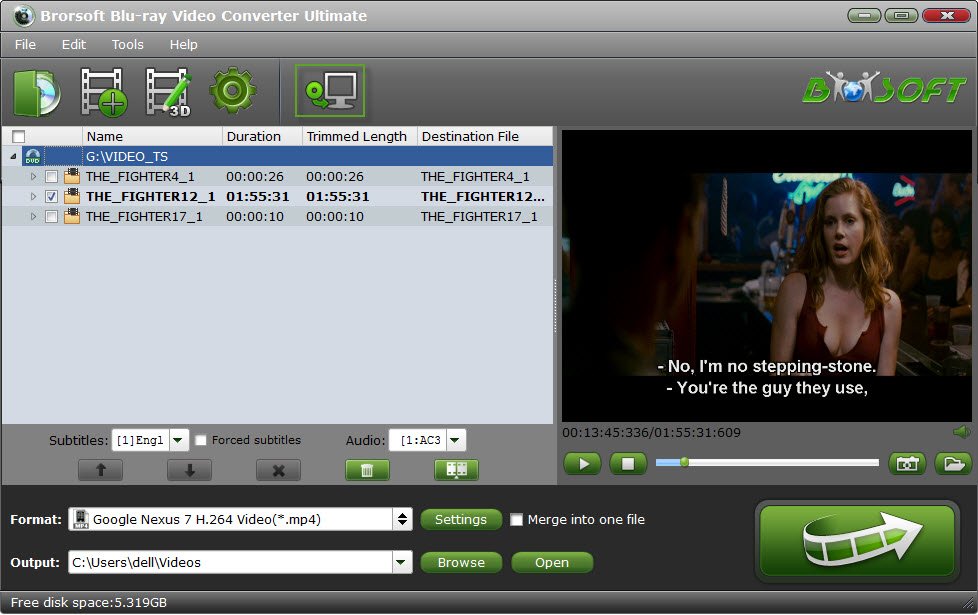
Step 1: Add source files (Blu-ray/DVD/videos)
Load Discs: Insert the Blu-ray disc to the Blu-ray Disc drive or DVD to the DVD-ROM and click the "Load Disc" button to have movies uploaded to the Program. You can also import ISO files, IFO files or Blu-ray/DVD folder for conversion.
Add Videos: Click "Add Files" or "Add From Folder" button to load video or audio files.
Tip:
1. Before loading Blu-ray content, a BD drive is needed
2. Computer should networked so that the Program can access key for cracking the copy-protections of Blu-ray or DVD disc.
If you need to backup Blu-ray/DVD with wanted subtitles and audio track, you can click the drop down menu after "Subtitles" and "Audio" to select your desired tracks. What’s more, it also offers an option called Forced subtitles, which enables you to see subtitles only when actors are speaking a different language.

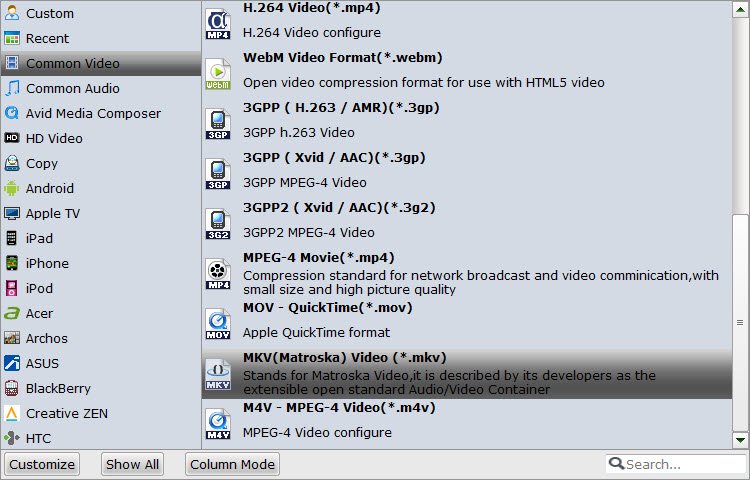
Step 2: Select output format
Click Format (located below where your source files are displayed) and select the format you want from the drop-down list.
If you want the generated movies can be played with Kodi (XMBC), you can choose backup Blu-ray/DVD/videos to MP4/MOV/AVI. Click the format bar to pick the Common Video/HD Video. In the drop-down list, you can choose HD AVI, HD MP4, HD MOV…
Tips: Adjust video/audio Settings (Optional)
If you want to customize output video quality in further, click Settings button to customize video quality like resolution, frame rate, bit rate, audio channel, etc.
Step 3: Start to convert
After above settings, click the big Convert button to start to convert Blu-ray/DVDs or video/audio files.
As soon as the conversion is done, simply click Completed to back to main interface, and click Open button to find generated videos.
Then you can stream the Blu-ray/DVD/videos to Kodi and play on your big srceen Android TV.
Tip: If conversion takes long time, you can set auto shut down by checking the box of Shut down computer after conversion.
Related Products
Video Converter Ultimate


Useful Tips
- Get DVD to Playback in Kodi(XBMC)
- Enable Blu-ray Movies Playback on XBMC (Kodi)
- Watch Blu-ray Movies on Kodi (XMBC) via USB
- Play and Management Blu-ray and DVD on Plex: Kodi Add -on
- Play Blu-ray DVD and Videos on Kodi 17
- Install Kodi on Android TV
- Watch DVD movies on Samsung TV
- Wath Blu-ray Movies on Samsung TV
- Watch DVD on Nvidia Shield TV
- Watch Blu-ray on Nvidia Shield TV
- Best Settings for Watching Blu-ray or DVD on TV via USB
- Best Settings for Watching Blu-ray or DVD on TV via DLNA
- Best Video Encoder/Transcoder for Home Media Server
- Rip DVD to Android Tablet/Phone
- Blu-ray to Android
- Stream Blu-ray DVD to Android TV
- Blu-ray to Android TV with Kodi
- Play DVD on Android TV with Kodi
- Play Tvio Shows on Android Devices
- Install Kodi on Android TV
- Convert Video_TS to Android
- Best Video Settings for Android Phones and Tablets
Android Devices Guides:
Social Connection
Copyright © 2009- Brorsoft Studio. All Rights Reserved.