How to Download & Import YouTube Videos to iTunes on Mac

As we know, YouTube is a video sharing website on which users can upload and share videos with friends, family, classmates and people all over the world, making our daily life more wonderful and convenient. For Mac users, we usually manage our media files like video and audio with iTunes. So I'm sure you will want to download the YouTube video to Mac for further watch or add YouTube videos into iTunes for playing on your iDevices. If so, you are in the right place. This tutorial will share some tips for downloading and converting YouTube videos into iTunes easily and freely.
Before importing YouTube videos into iTunes, you need do some preparations. First, you need to download YouTube videos on your Mac, and then convert YouTube (.flv) video to iTunes supported video formats. Afterwards, it would be easy for you to import a YouTube video to iTunes on Mac.
Part I. How to download YouTube videos on your Mac
Actually, there are kinds of methods for downloading YouTube video to your Mac. Here we show you how to download videos from YouTube to your Mac with Safari.
After opening the URL, pause the video when it starts to play for seconds, and wait for the video to fill the grey progress bar. Then click Window on the menu bar -> Activity, and find the line that represents your video, double click it and the download will begin.

With this method, you do not need any downloader or software, but have to wait for the videos being complete processed.
Part II. Convert YouTube (.flv) video to iTunes supported video formats
As we all know, all YouTube videos are saved in .flv that iTunes cannot recognize. So to put YouTube video onto iTunes, you'd better convert YouTube video to iTunes supported video formats like MOV, MP4, M4V initially. To complete this task perfectly, here I highly recommend you try Brorsoft iMedia Converter for Mac. With it, you can free to convert among HD and SD videos like MKV to AVI, FLV to MP4, AVI to MOV, WMV to FLV, etc on Mac and transfer any YouTube videos to iPhone, iPad, iPod, Samsung Galaxy, HTC, etc without sacrificing video quality. If you are a Windows user, turn to the Windows version fro help.
Read More:
| Convert YouTube to iPhone | Best ways to Play FLV on Mac | Upload MKV to YouTube | Upload DVD to YouTube |
| Upload DVD to FaceBook | Cut DVD for FaceBook | Upload DVD to DropBox | Upload Blu-ray to DropBox |
Step 1: Install YouTube to iTunes Converter for Mac. And then click Add to browse your computer hard drive and select the YouTube files you want to convert.

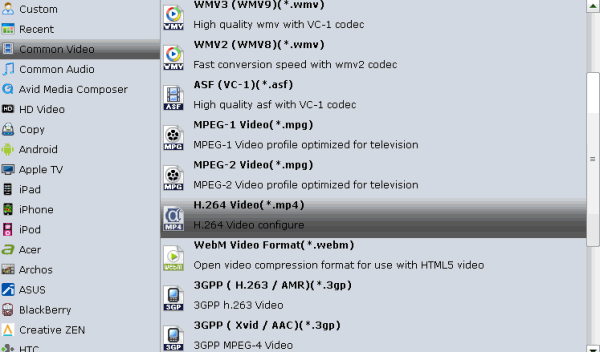
Step 2: Since iTunes supports MP4, M4V and MOV formats, you can click Format bar and choose any of the three from Common Video as the output file format. If you want to import .mkv, .avi, .wmv, .flv to iTunes for playing on iPhone, iPad, iPod, Apple TV, etc., you can also directly select a format from decent device preset like iPad.
Tip: If you need, you can click Settings to set the video parameters like bit rate, resolution, frame rate, etc. Remember the file size and video quality is based more on bitrate than resolution which means bitrate higher results in big file size, and lower visible quality loss.
Step 3: When all settings are done, simply click the Convert button to begin the conversion from iTunes FLV to iTunes format. When the conversion is finished, you can import and play your YouTube videos on iTunes or transfer them to iPhone, iPad via iTunes with ease.
Related Products
iMedia Converter for Mac


Useful Tips
- MKV to iTunes
- AVI to iTunes
- WMV to iTunes
- VOB to iTunes
- MP4 to iTunes
- MPG to iTunes
- FLV to iTunes
- Best DVD Ripper for iTunes
- Copy DVD to iTunes
- Video_TS to iTunes
- 3D Blu-ray to iTunes
- Rip Blu-ray/DVD to M4V for iTunes
- Convert FLV to MOV on Mac
- Add FLV to iTunes
- 3 Ways to Play FLV on Mac
- Insert FLV to PowerPoint
- Import FLV to Final Cut Pro
- Convert DVD VRO to FLV
- DVD ISO to FLV
- Add subtitles to FLV videos
- DVD to iPhone 6
- DVD to iPhone 7/7 Plus
- Top 6 Free Video Player for iPhone 6s
- Share Contents to IOS Devices fro iTunes
- Top 3 Flash Player for iPhone 6 Plus
- Blu-ray to iPhone 7/7 Plus
- Tivo Shows/Blu-ray/DVD to iPhones
- Play Blu-ray on iPhones with VLC
- DVD to iPhone 8 (iPhone X)
- Blu-ray to iPhone 8/iPhone X
- Blu-ray to M3U8 for IOS Streaming
- Video_TS to iTunes for iPad/iPod
- Rip Blu-ray to iPad Mini 4 Mac
- Rip Blu-ray to iPad Pro Mac
- Convert Divx to iPod on Mac
- Convert ISO to iPad
- Play Blu-ray on iPad 2017
- Play DVD on iPad 2017
- Stream Music to iPad from iTunes
- Play Flash Video on iPad
FLV Video Tips:
iPhones Guides:
iPads Guides:
Social Connection
Copyright © Brorsoft Studio. All Rights Reserved.