How to Backup Blu-ray/DVD to MediaFire for Streaming?

MediaFire is an online storage service that offers unlimited bandwidth, over 50 GB of free storage, and easy access to upload and view your files on nearly any device. It's free iOS and Android apps are available that let you share the public download link for your data and well as upload images and videos from your device. You can also just use the MediaFire website to upload files and folders directly to your account. For those who have problems to backup Blu-ray/DVD movies to MediaFire for easier streaming, you'll get some useful tips in this simple guide.
To store and backup your Blu-ray/DVD movies onto MediaFire, there are two basic things you need to do. First, rip the movies contents off of your Blu-ray/DVD discs. Second, convert the Blu-ray/DVD movies to MediaFire and target devices compatible video formats like MP4, MOV, etc for smoothly streaming. The job can be done effortlessly with the help of Brorsoft Blu-ray Ripper.
With it, you can rip/convert any (protected) Blu-ray/DVD to MediaFire compatible video formats MOV, MP4 as well as other popular formats like AVI, MKV, M3U8, H.265, WMV, MPG, M4V, etc quickly and losslessly. Besides, you're also allowed to convert your Blu-ray/DVD collections to store or share on Google Drive, DropBox, iCloud Drive, and more cloud storage. If you are a Mac user, please turn to Brorsoft Blu-ray Ripper for Mac.
Free download Best Blu-ray/DVD to MediaFire Converter:
Guide: Rip and Backup Blu-ray/DVD Movies to MediaFire
NOTE: Anywhere from 30 to 60 GB of hard disk space is needed depending on what you’re ripping. Blu-Rays are big, and we’re going to rip the whole thing to our drive first, so depending on the movie you’re ripping and the quality you want in your final movie file, you’ll need a good amount of space. Here, Windows version Blu-ray ripper taken as example, Mac share the same way except tiny differences on interface.
Step 1. Import Blu-ray or DVD movies
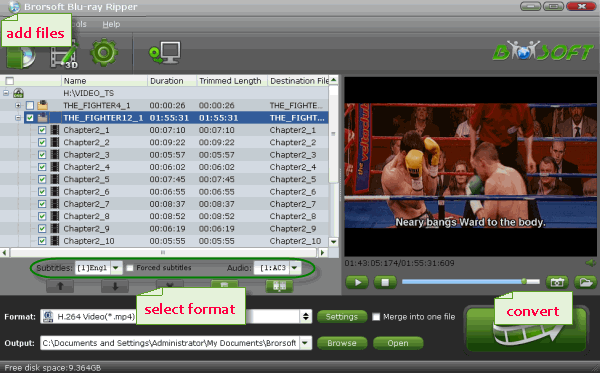
Install and run the best BD/DVD to MediaFire converter, then click load disc icon to load your Blu-ray/DVD movies to the program. Here, BD/DVD Video_TS folder, ISO/IFO files are supported as well.

Step 2. Choose output format
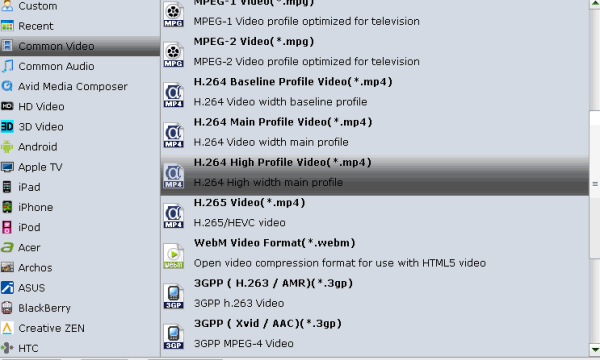
Press the "Format" option, and choose H.264 MP4, QuickTime MOV, format in "Common Video" list. If you want to keep 1080p resolution, you can choose those formats in "HD Video" category.

Tip: Click "Settings" icon, it lets you make adjustments to the video settings. For example, lowering the frame rate can help reduce the file size. You'd better keep the balance of your video quality and video size.
Step 3. Start ripping Blu-ray/DVD for MediaFire
With all settings, tap the "Convert" button to rip and convert Blu-ray/DVD movie to MediaFire compatible formats. After the conversion, click "Open" to find converted videos, then backup them to MediaFire for easier streaming as you like.
Useful Tips
- Rip DVDs for Plex
- Rip Blu-ray for Plex
- Rip DVD for DLNA
- Rip Blu-ray for DLNA
- Upload DVD to iTunes
- Upload Blu-ray to iTunes
- Upload DVD to iCloud
- Upload Blu-ray to iCloud
- Upload DVD to Dropbox
- Upload Blu-ray Dropbox
- Rip DVD for Emby Server
- Rip Blu-ray for Emby Server
- Upload DVD to Google Drive
- Copy DVD to Synology NAS
- Copy DVDs to Drobo 5n NAS
- Store Blu-ray to NAS
- Copy Blu-ray to Seagate
- Copy Blu-ray to USB Flash Drive
- Blu-ray & DVD to WD MyCloud
- Copy DVD to Q-BOX 4K TV Box
- Backup Blu-ray and DVD to MediaFire
- Store and Upload Blu-ray and DVD Movies to OpenDrive
- Upload Blu-ray and DVD Movies to OneDrive
- Upload Blu-ray Movies to MEGA Cloud
- Backup DVD Movies to MEGA Cloud
- Rip DVD to SSD
- Rip and Backup Blu-ray to SSD
Copyright © Brorsoft Studio. All Rights Reserved.


