How to add FLV videos to iTunes library on Mac
Nowadays, the majority of videos online are stored in FLV format. The main reason behind this is that FLV is featured with small storage and fast loading speed. Chances are you have some FLV video files downloaded from the YouTube or other video sharing websites, there are a big possibility that you want put FLV to iTunes to manage or sync to iPhone, iPad, iPod or other iDevices etc. If you are in such demands, you are come in the right place! In this article, you'll learn how to add FLV to iTunes library with ease.
Unfortunately, iTunes only supports MP4, MOV and M4V formats, and FLV is not an iTunes-supported video format. That's to say, you can't directly import FLV movie files to iTunes. Therefore, before importing FLV media files into iTunes, you'd better convert FLV to iTunes playable video formats. In this case, a professional FLV to iTunes video converter like Brorsoft iMedia Converter for Mac will be a great choice for saving you a lot of time and effort!
With running it, user can effortlessly convert FLV as well as other popular video formats like AVI, VOB, MKV, TiVo, MPG to iTunes supported MOV, M4V, MP4 format without compressing any video quality. Apart from that, people who want to make changes to the video can easily touch up the video with its built-in editor. This Video to iTunes Converter is well compatible with Mac system (El Capitan included). For Windows users, you can convert videos to iTunes (iTunes 13) on Windows (Windows 10 included) by taking advantage of Brorsoft Video Converter Ultimate. Now download this software and enjoy the magic of importing FLV files to iTunes.
How to Convert and Import FLV to iTunes on Mac (El Capitan & Yosemite Included)
Step 1: Import FLV videos to the converter
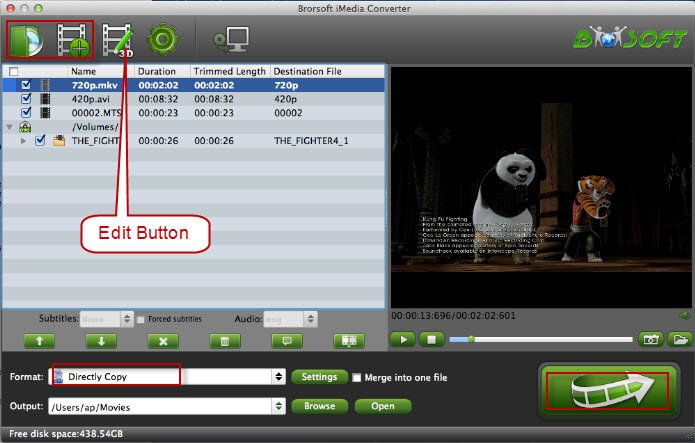
Download and install the Mac Video Converter. Click Add button to upload FLV files from your computer or other devices like USB, cell phone, etc. You can also directly drag the video files into the program directly. If you want to join FLV files together, just check the "Merge into one file" box.
Step 2. Select iTunes supported format
Since iTunes supports MP4, M4V and MOV formats, you can click Format bar and choose any of the three from Common Video as the output file format. If you want to import FLV videos to iTunes for playing on iPhone, iPad, iPod, Apple TV, etc., you can also directly select a format from decent device preset like iPad.
Tip- Video/Audio parameter settings:
If you need, you can click Settings to set the video parameters like bit rate, resolution, frame rate, etc. Remember the file size and video quality is based more on bitrate than resolution which means bitrate higher results in big file size, and lower visible quality loss.
Step 3. Start converting videos to iTunes
When all settings are done, simply click the Convert button to begin the conversion from FLV video files to iTunes format. When the conversion is finished, you can import and play your videos on iTunes or transfer them to iPhone, iPad via iTunes with ease.
Tip: To import videos to iTunes, open iTunes and go to File > Add to Library or directly drag and drop the converted video to iTunes. And then find the video in the Movies category. Now you are able to organize FLV in iTunes and even transfer to iOS devices like iPhone, iPad, iPod etc. for killing time on the move.
Related Products
iMedia Converter for Mac


Useful Tips
- Convert FLV to MOV on Mac
- Add FLV to iTunes
- 3 Ways to Play FLV on Mac
- Insert FLV to PowerPoint
- Import FLV to Final Cut Pro
- Convert MP4 to M4V for iDevices
- Convert MKV to iTunes
- Convert AVI to iTunes
- Convert WMV to iTunes
- Convert VOB to iTunes
- Convert MPG to iTunes
- Convert DVD to iTunes
- Convert Blu-ray to iTunes
- FLV to iTunes
- Video_TS to iTunes
- Rip Blu-ray/DVD to M4V for iTunes
- Best DVD Ripper for iTunes
- Play iTunes Movies and TV Shows on HTC U11
iTunes Guides:
Social Connection
Copyright © Brorsoft Studio. All Rights Reserved.