NAS vs Cloud | Which one Better for Backuping Blu-ray / DVD / Videos
Nowaday, people are willing to backup their data and files to NAS (Network Attached Storage) or Cloud Storage to get the way of being able to access all their files on any of their computing devices. But NAS vs Cloud, which one to choose?
NAS |
Cloud |
||
| Sharing | |||
Direct Link to File Access |
Direct Link to File Access | ||
| Stream Media Online (via Browser, App, Console, etc) |
Stream Media Online (via Browser at website) |
||
| Many more means of Access (any network enabled devices) |
Quicker, Easier to share folders | ||
| Can Sync, Access and Share with Cloud Services | iOS, Android, Desktop apps | ||
| Access | |||
| Longer Setup Time 45mins - 24hrs (Firmware, RAID, etc) |
User Friendly Interface 2 -3mins to Setup |
||
| Wide variety of Apps and Tools | Limited to Folder by Folder Access | ||
| Security | |||
| AES-256 or AES-NI Encryption | Very Secure AES-256 Encryption | ||
| Limited Redundancy (HDD Backup) (Cost, # of bags, choice of RAID) |
Limitless Redundancy (HDD Backup) | ||
| Disconect NAS, Delete Files or Physically Destory the Drives | Suspend/Delete your Account | ||
| Cost | |||
| Synology DS214SE 1TB |
QNAP TS-231 1TB |
DropBox 1TB |
Google Drive 1TB |
| $197 ex.VAT (Box + 2x 1TB) |
$262 ex.VAT (Box + 2x 1TB) |
$95+ | $120+ |
| Conclusion | |||
| NAS is overkill for under 1 TeraByte Larger file Access & Manipulation Greater deep of use - Web/Mail Server - HDMI-to-TV access - Complex File Formats - Business applications |
Short Term, Low capacity Solution Limited to typical file useage |
||
Should I buy a NAS or use online cloud storage for backup?
As the sharing, access, security, cost features have been listed on the table above as well as the conclusion, I am not you, the features and conclusion just for reference.
If you perfer to get yourself a NAS devices, please turn to this page for backing up your Blu-ray disc, DVD disc and video files.
If you perfer to get yourself a cloud account, please turn to this page for ripping and saving your Blu-ray movie, DVD movie and video files to cloud storage.
Below guide for you, no matter you choose a NAS devices or a Cloud storage, you can alway backup your Blu-ray, DVD and video files.
How to backup Blu-ray, DVD and videos on a NAS devices or cloud storage?
In order to backup your movies from Blu-ray or DVD disc as well your local videos (any format) to NAS or Cloud, and compatible with the portable devices for playing on network media players/Media Streamers, Smart TVs, network-enabled Blu-ray Disc players, you need a Blu-ray / DVD / Video Converter, ripping or converting them to the devices compatible certain foramt first. Here Brorsoft Video Converter Ultimate / iMedia Converter for Mac is just the one, it is an all-in-one video converter, DVD ripper, Blu-ray Ripper, DVD/Blu-ray copy software and video editor.
With it, you can remove all the copy protection and region code of Blu-ray and DVD disc, ripping them to all popular video/audio formats like MP4, MOV, MKV, AVI, AAC, MP3 as you need for playback on different devices, such as Android, iPhone(7), HDTV, etc, you can also convert the video clips from your camera or camcoder, such as MXF, XAVC ... to your devices compatible format.
In addition, taking advantage of the NVIDIA® CUDA and AMD technologies acceleration technologies, the conversion speed is increased up to 6 times faster than ever before.
Here in this guide, we take Video Converter Ultimate screenshot as example, the iMedia Converter for Mac share the same steps. You can download the free trail version of Blu-ray ripper below quickly:


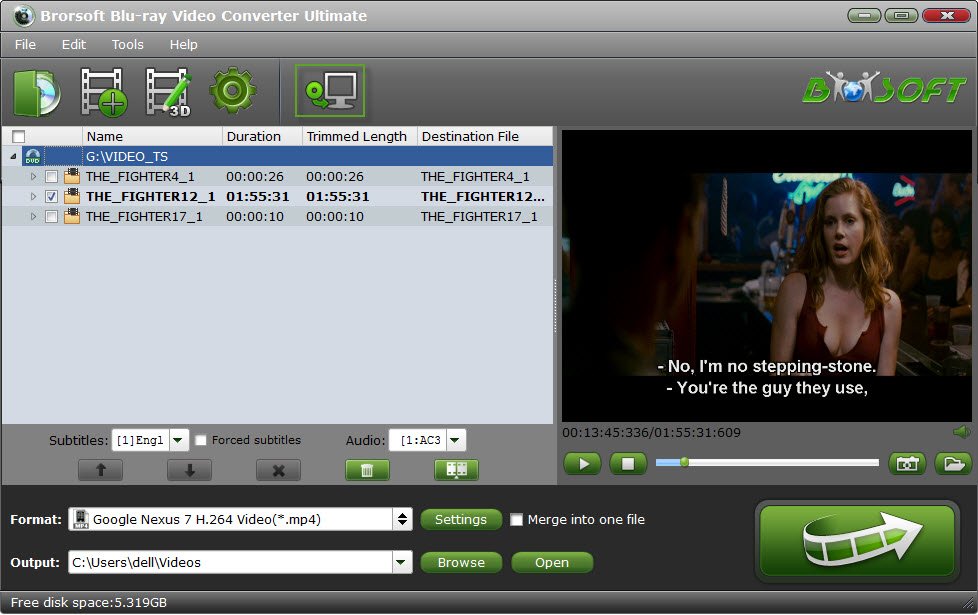
1. Add Video files
Click the"Add Files" or "Add From Folder" button to load video or audio files or click the "Load Disc" button to have DVD/Blu-ray movies uploaded to the program.
Tip:
1. Before loading Blu-ray content, a BD drive is needed and computer should networked so that the ripper can access key for cracking the copy-protections.
2. For Converter Blu-ray and DVD, once the disc/files are loaded, you can select the subtitles and audio track you prefer. On the right windows, you can preview your files and take snapshots of your favorite movie scenes.

Step 2. Choose output format
Select an compatible format, e.g. H.264 .mp4, since it is compatible with almost any Cloud Storage, NAS devices and media players.
Basically the "Common Video -> H.264 Video (*.mp4)" is just all right.
Or depends on your device, you can choose a suitable video format from catalogues.
Tip: If you think the video size this not suitable for your devices, you can first choose any one of the provided type, then change the settings. Please remember the file size is based more on bitrate than resolution which means bitrate higher results in bigger file size, and lower visible quality loss.
Step 3. Start to backup Blu-ray/DVD
When all the settings are OK, click "Convert" button to convert Blu-ray disc, DVD disc and video files.
You can view the conversion progress and are able to cancel the converting process at anytime ...
When the conversion is over, click "open" to locate the ripped Blu-ray movies, DVD movies and video files, and then you can transfer them to your NAS devices or upload them to Cloud Storage for playing on network media players/Media Streamers, Smart TVs, network-enabled Blu-ray Disc players, and to other computers in your home.
Tips & Tricks
- Copy DVD to Synology NAS
- Copy Blu-ray to NAS
- Copy DVD to NAS
- Store Blu-ray movies on Synology NAS
- Store Blu-ray to NAS for Plex Streaming
- Backup DVD to Drobo 5N NAS For Streaming
- Use Jriver Media Center to Manage QNAP NAS Media Files
- Copy DVD/Blu-ray to Unraid Server for watching via Plex
- Play Video_TS on Panasonic TV
- Backup Blu-ray/DVD to NAS for Plex
- Rip/Backup Blu-ray/DVD Videos to NAS
- Backup/Store Blu-ray/DVD to QNAP
- Play Blu-ray/DVD on QNAP NAS with Roku
- Backup Blu-ray/DVD to Seagate
- Backup Blu-ray/DVD to Drobo
- Backup Blu-ray/DVD to Asustor
- NAS vs Cloud
- Access Blu-ray/DVD on Synology with PS4/PS3
- NAS Blu-ray/DVD to MKV Converter
- Stream VOB files Via Plex
- Video_TS/ISO to Plex
- Plex MP4 Solution
- ISO to Plex
- AVI to Plex
- BD/DVD to Plex via Chromecast
- DVD to LG TV via Plex
- Blu-ray to NAS for Plex
- Plex Supported and Unsupported Media Formats
- Stream Blu-ray to PS4 via Plex
- Set up Plex Media Server
- Blu-ray to Plex Ripper Review
- Stream BD/DVD to Xbox One via Plex
- Stream Videos to Rolu with Plex
- Install Plex App on ATV 4
- Rip Blu-ray to Plex Media Server
- Rip DVD to Plex Media Server
- Play Blu-ray on ATV via Plex
- Play DVD on Apple TV via Plex
- Backup BD/DVD to NAS for Plex
- Play BD/DVD on Kodi via Plex
- DVD to Galaxy S8/S8+ Using Plex
- Rip TV Series DVD to Episodes for Plex
- Stream ISO to Roku via Plex
- Best Ripit Alternatives
- Best DVD Decrypter Alternative
- Tip 5 Alternative to MactheRipper
- Format Factory Features/Instructions/Alternative
- Top 10 Ogmrip Alternatives
- Alternative to MakeMKV for Rip BD/DVD
- Alternative to Magic DVD Ripper
- Handbrake New Features and Alternatives
- Best Vidcoder Alternative
- Rip DVD with Best Handbrake Alternative
- Get MakeMKV Alternative
- Rip DVD with DVDfab Alternative Mavericks
- DVD to iTunes 12 Handbrake Alternative
- DVD43 Alternative to Rip DVD
- Handbrake Alternative
- MacTheRipper Yosemite Alternative
- FreeMake Video Converter Alternative Mac
- Best AnyDVD Alternatives for Handling Commercial DVD
- Get Format Factory Alternative for Mac
- Rip Blu-ray with Handbrake
- Rip DVD with Handbrake Alternative
- Rip Protected DVD with Handbrake Mac
- VLC 2.0 Rip Encrypted DVD with Handbrake
- DVD to iTunes via Handbrake Alternative
- Fix Handbrake cannot Rip Disney DVD
- Convert Video_TS/VOB to MP4 with Handbrake
- Encode Blu-ray/DVD to H.265 with Handbrake
- Rip Hollywood Blu-ray/DVD with Handbrake
- Encode H.265 with Handbrake
- Handbrake New Features and Alternatives
- Handbrake input and Output Format
- 7 Things Handbrake Do
- Rip DVD Free with Handbrake
- Free Mac DVD Ripper
- Handbrake Alternative
Plex Tips:
Alternatives:
Handbrake Guides:
Social Connection
Copyright © Brorsoft Studio. All Rights Reserved.