How to Encode HEVC: Handbrake Settings to Use
HandBrake added the support for new H.265 encoder, together with VP8 and Intel QuickSync Video. Up to the latest version 1.0.3, HandBrake has updated x265 to 1.4 with better performance and fewer bugs. Since most non-experts are confused about HandBrake x265 profile, the article is in the purpose of illustrating the best HandBrake x265 settings in detail.
Note: To make the best HandBrake x265 advanced settings for converting 4K UHD or full HD videos, you need to make sure that you've downloaded and installed HandBrake 1.0.0 or above.
Encode HEVC With Handbrake
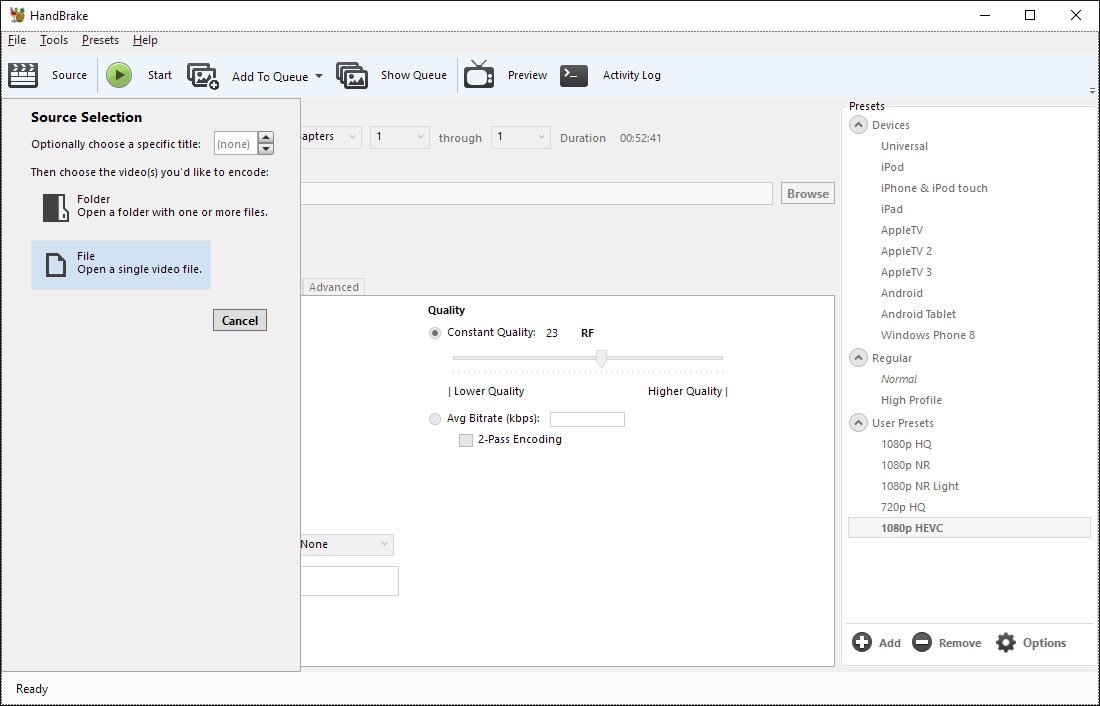
Step 1: Launch HandBrake, input the file you want to be transcoded by clicking the large Source button and then File (clicking Folder allows you to easily set up batch encodes). Then set a destination by browsing to whatever folder you desire.
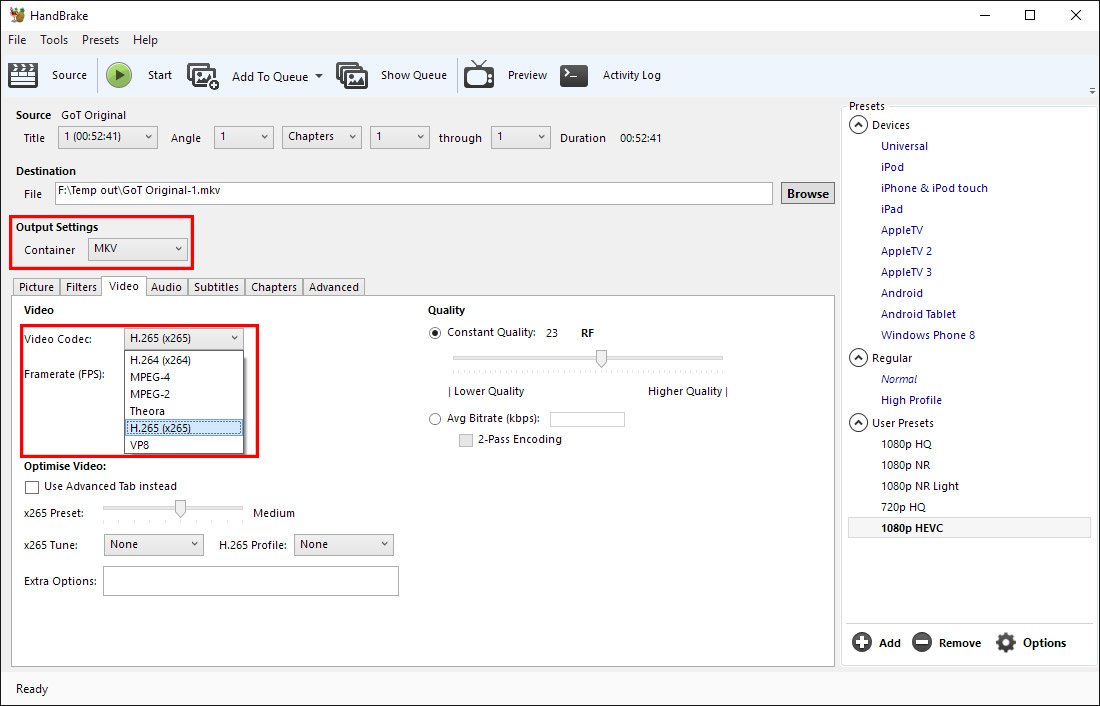
Step 2: You’ll want to change the video codec under the Video tab from H.264 to H.265 (x265).
• Also, change the container from MP4 to MKV so that you can embed subtitles if you want to.
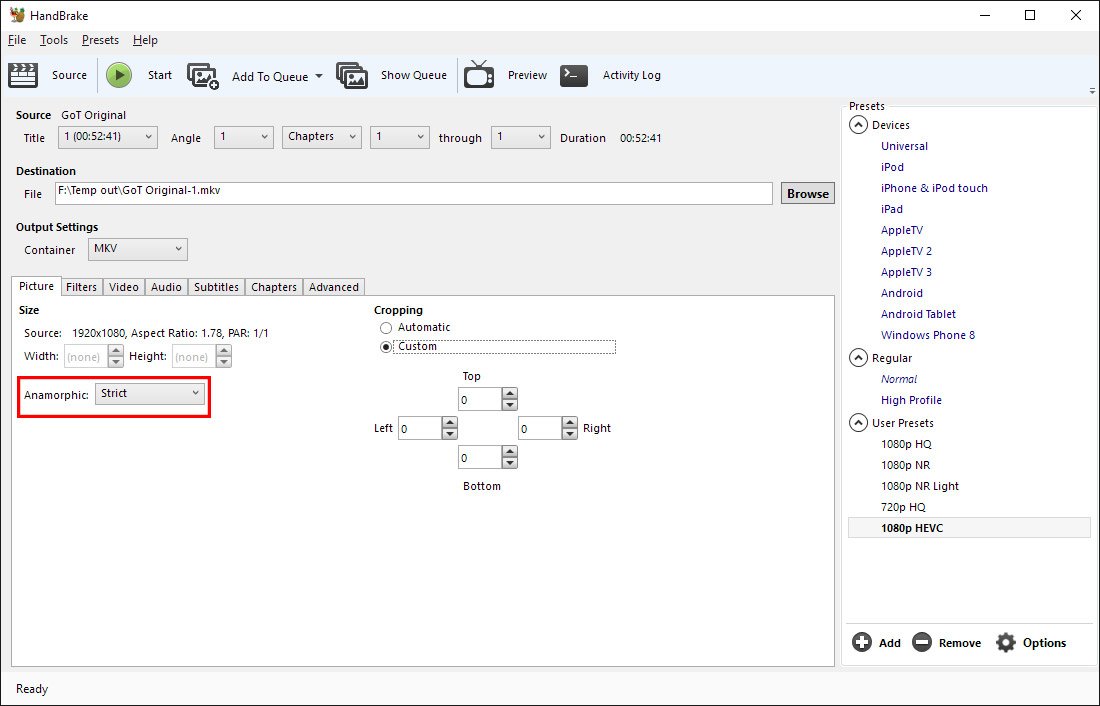
Step 3: Head to the Picture tab, and set Anamorphic mode to strict. Also check to make sure the automatic cropping feature has detected the correct settings.
Sometimes it will erroneously crop out a few pixels on any side, but you can address this by switching to custom with 0 set in every location box. If, however, you have a 21:9 video encoded in 16:9, the cropping feature will automatically crop out the black bars at the top and bottom.
Step 4: In the Filters tab, you’ll only want to modify these settings where necessary, leaving everything else ‘off’.
If a TV show is interlaced, for example, it’s a good idea to set Decomb to Fast as this will only deinterlace frames that are visibly interlaced. If you want to remove noise or grain from a source, setting Denoise to hqdn3d with a custom preset of 1:1:4:4 is a solid choice.

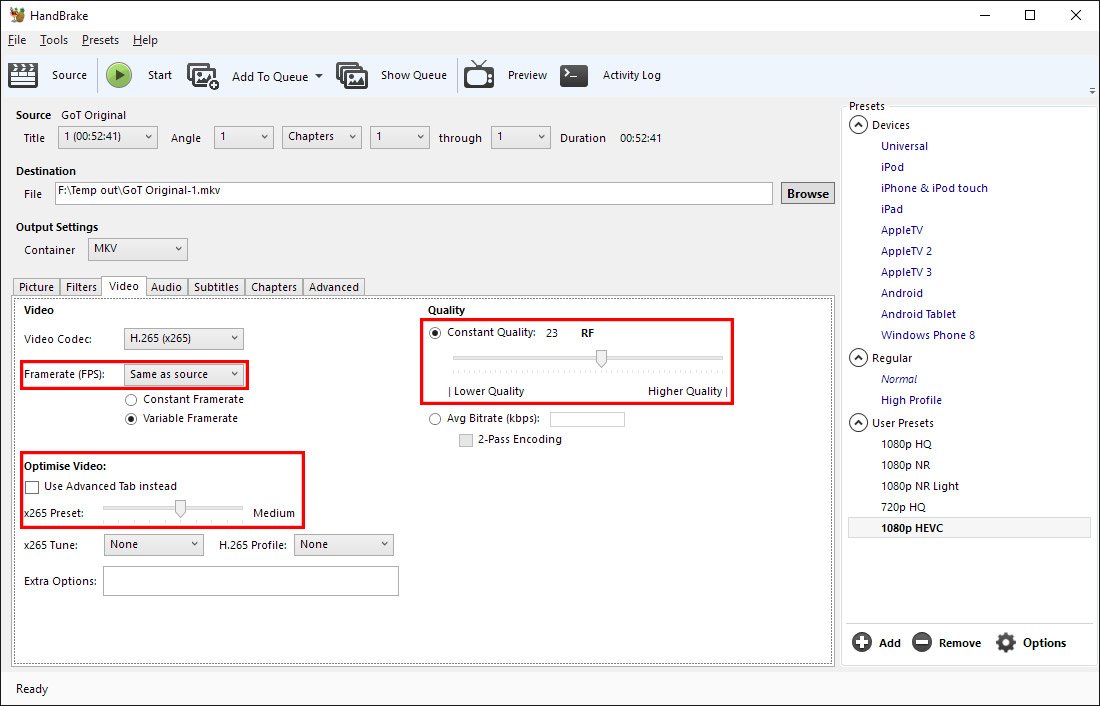
Step 5: In the Video tab you’ll want to select some specific settings
• Make sure framerate is set to ‘same as source’ and that the ‘Use advanced video tab instead’ box is unchecked.
Then, select an x265 preset of Medium by adjusting the slider down from the default Ultrafast setting.
• Setting it higher will result in a larger file and faster encodes, and setting lower will reduce the file size at the expense of significant longer encode times.
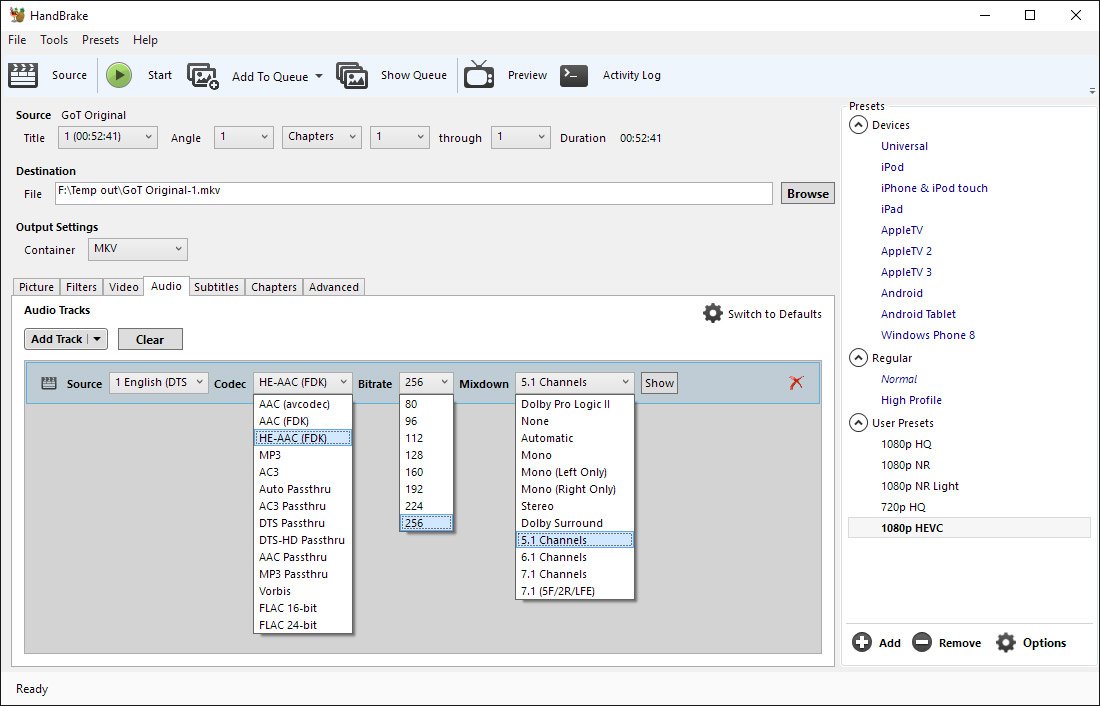
Step 6: In the Audio tab, change the codec to HE-AAC (FDK), the bitrate to 256, and the mixdown to 5.1 channels.
If your source has only 2.0 channel audio, leaving the setting on 5.1 will still encode only 2.0 audio; in other words, it won’t transform a stereo source into surround sound using any filters or magic. Here you might want to play with bitrates to whatever you desire, although I think 256 delivers great quality for TV show audio.
Optional:
• Pass through any subtitles from your source by heading to the Subtitle tab, clicking Add Track, then selecting Add All Remaining Tracks. From here you can also “burn in” subtitles, which codes the text into the video stream so you can see the subtitles on video players that don’t support in-file subtitles (though you can’t turn off the subtitles). Setting subtitles to “forced only” tells a video player to display subtitles even when the audio track matches your set language: this is useful for displaying a subtitles when dialogue isn’t in English; for example, during alien conversations in a sci-fi film.
• Save these settings as a preset so you can revisit them easily in the future.
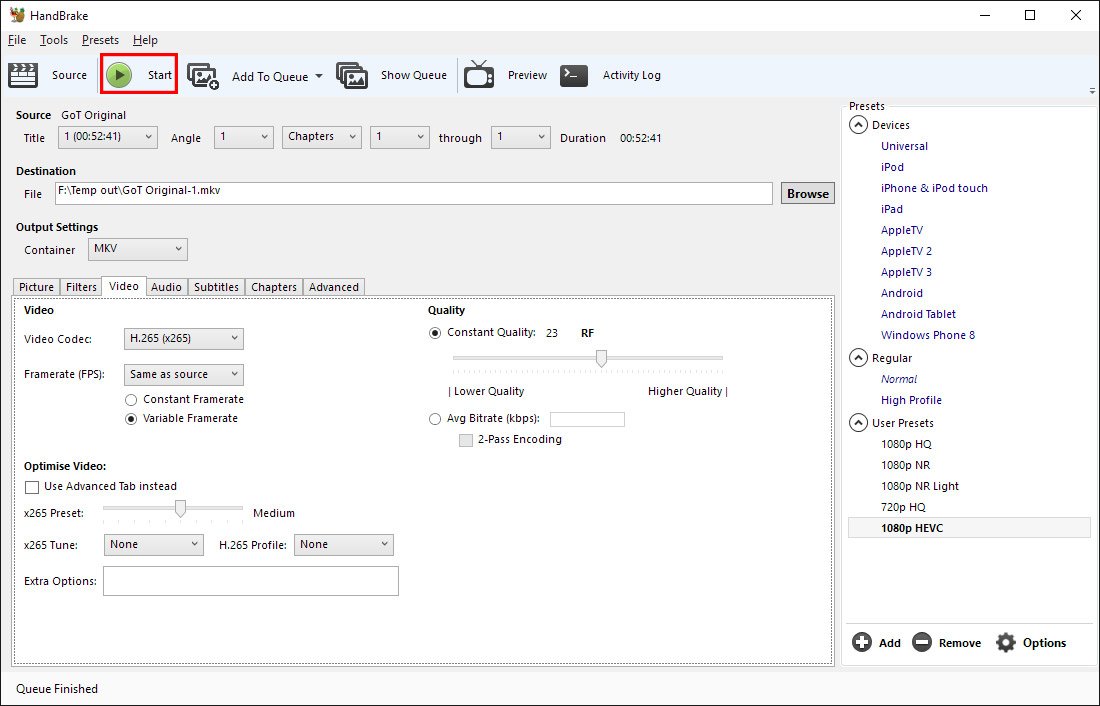
Step 7: Now you should be all good to go.
Click Start and let the encode happen, which may take a considerable amount of time depending on your hardware.
After the encode is done, text saying ‘finished’ will appear in the bottom left corner.
Read More:
HEVC/H.265 - Hardware/Software/Boxes and Console Support - In this article, we show you why H.265 is better than H.264 as well as H.265 Hardware Support, H.265 Software Support, H.265 Streaming Boxes and Console Support, enable you watch HEVC videos with all your portabel devices and media players.
From Handbrake Supported Input and Output File Formats, we know that it still unsupport of Blu-ray disc and protected DVD disc, if you want to backup your Blu-ray and DVD movies from physical disc with HEVC codec for watching on your portable devices, Brorsoft Video Converter Ultimate / iMedia Converter for Mac should take into your consideration, all commercial protected Blu-ray and DVD movies can be ripped to H.265 codec videos as well as nearly all popular video and audio formats like MP4, MOV, MKV, AVI, AAC, MP3 as you need for playback on different devices, such as Android, iPhone(7), HDTV, etc.
In addition, taking advantage of the NVIDIA® CUDA and AMD technologies acceleration technologies, the conversion speed is increased up to 6 times faster than ever before.
Tips & Tricks
- Rip Blu-ray with Handbrake
- Rip DVD with Handbrake Alternative
- Rip Protected DVD with Handbrake Mac
- VLC 2.0 Rip Encrypted DVD with Handbrake
- DVD to iTunes via Handbrake Alternative
- Fix Handbrake cannot Rip Disney DVD
- Convert Video_TS/VOB to MP4 with Handbrake
- Encode Blu-ray/DVD to H.265 with Handbrake
- Rip Hollywood Blu-ray/DVD with Handbrake
- Encode H.265 with Handbrake
- Handbrake New Features and Alternatives
- Handbrake input and Output Format
- 7 Things Handbrake Do
- Rip DVD Free with Handbrake
- Free Mac DVD Ripper
- Handbrake Alternative
- Best Ripit Alternatives
- Best DVD Decrypter Alternative
- Tip 5 Alternative to MactheRipper
- Format Factory Features/Instructions/Alternative
- Top 10 Ogmrip Alternatives
- Alternative to MakeMKV for Rip BD/DVD
- Alternative to Magic DVD Ripper
- Handbrake New Features and Alternatives
- Best Vidcoder Alternative
- Rip DVD with Best Handbrake Alternative
- Get MakeMKV Alternative
- Rip DVD with DVDfab Alternative Mavericks
- DVD to iTunes 12 Handbrake Alternative
- DVD43 Alternative to Rip DVD
- Handbrake Alternative
- MacTheRipper Yosemite Alternative
- FreeMake Video Converter Alternative Mac
- Best AnyDVD Alternatives for Handling Commercial DVD
- Get Format Factory Alternative for Mac
- MediaCoder Alternative for Mac
- Rip DVD on Windows 10
- Rip Blu-ray on Windows 10
- Rip DVD on macOS Sierra
- Rip Blu-ray on macOS Sierra
- Convert DVD to H.265
- Rip Blu-ray to H.265
- Play HEVC on Mac OS X
- Encode videos to H.265 MP4
- Backup Blu-ray to H.265 Windows 10
- Blu-ray to Samsung TV h.265 codec file
- BD/DVD to H.265 with Handbrake
- Blu-ray to MKV with H.265/H.264 Codec
- Encode Blu-ray to H.265/h.264 MP4
- Best H.265 Encoder for Windows
- H.265 Hardware Software Boxes Console Support
- Fix FFmpeg Won't Transcode Videos to H.265 HEVC
- Free to Convert Video_TS to H.265/HEVC
- Convert DVD to H.264
- Convert ISO to H.264
- Convert Blu-ray to H.264
- Vob to H.264 MP4 MKV MOV
- Rip Blu-ray to Digital H.264 Videos
- Upload DVD to Vimeo with H.264 Video
- Video_TS to H.264 MKV for PLEX
- Speed Up DVD to H.264/H.265 Ripping
- Enable NVIDIA Acceleration for BD/DVD Ripping
- Best ISO to H.264/H.265 Ripper
- Blu-ray & DVD Ripper Review
- Open Source DVD Ripper
- DVD Ripper macOS Sierra
- Top 5 FREE DVD Ripper
- Top 5 Best Blu-ray Ripper
- Top 5 Best DVD Players
- Top 5 Best Blu-ray Players
- Blu-ray vs DVD: What difference?
- Blu-ray & DVD Ripper for Plex Review
- Ripping Copy Protected Disney DVD Review
- Brorsoft DVD Ripper vs Winx DVD Ripper
- Brorsoft Blu-ray Ripper vs Leawo Blu-ray Ripper
- Brorsoft Video Converter Ultimate vs Wondershare Video Converter Ultimate
- [Review] Best 4K Blu-ray Ripper
- [Review] Comparison of Best Blu-ray to MP4 Ripper
- [Review] Comparison of Best DVD to MP4 Ripper
- Convert ISO files to MP4/H.264/H.265 Review
- Download Best Blu-ray Ripper Applications for Mac
- Download Free DVD Ripper Applications
- Review: Best Blu-ray Ripper & Blu-ray Copier 2016-2017
- Review: Best DVD Ripper & DVD Copier 2016-2017
- The Best DVD Ripper Software 2017
- The Best Blu-ray Ripper Software 2017
- The Best ISO Converter Software 2017
- Best Tool to Easily Rip your Blu-ray & DVD as Well as Videos 2017
Alternatives:
General Solution
H.265 Video Tips:
H.264 Video Tips:
Blu-ray/DVD Review
Social Connection
Copyright © Brorsoft Studio. All Rights Reserved.