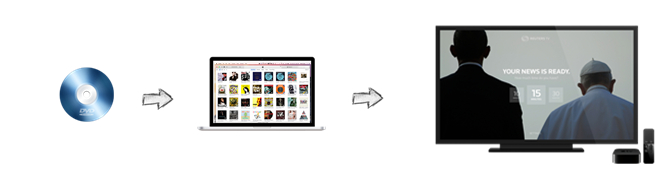
How to Import DVD to iTunes for Watching on Apple TV
| "I was wondering what is the easiest way to copy my personal DVD's to my iTunes library so I can watch them on my Apple TV purchased last week. Any help would be appreciated." --from Apple Communities |
You can watch the DVD movies you have hired or purchased from the Apple store, but when you try to view a DVD, it comes out grey. I believe it is legal to watch a DVD you have purchased or rented no matter on Apple TV or other devices. Here below, two methods for you to watch all the DVD movies on your Apple TV.
Method 1. Rip with Handbrake
RIP the common DVD to your computer using Handbrake. (Handbrake is free, turorial: rip dvd with Handbrake.) In Handbreak select ‘Apple TV’ as the preset. You can then drop the movie into iTunes and access it from your Apple TV. You need to do this before you watch the movie and it can take up to an hour or two. Alternatively you can copy the ripped DVD to a thumb drive and stick the thumb drive into the Apple TV USB port.
Method 2. Rip with Brorsoft
RIP the common and commerical DVD to your compputer using Brorsoft DVD Ripper.(Perfessional DVD Ripper, rip all the DVDs, copy protected commercial DVD, such as Disney DVD.) With Brorsoft select, you can not only rip and copy DVD to preseted Apple TV profile, but also convert DVD movies to almost any other common video format such as H.264, MKV, QuickTime, MOV, H.265(HEVC) or backup the DVD keeping the whole movie structure as you need.
| If you want to watch Blu-ray on Apple TV, please get Blu-ray Ripper (trail version provided) and follow the guide here. |
Guide: How to Rip DVD to iTunes for Apple TV
Download and install Brorsoft DVD Ripper for Mac (compatible with macOS Sierra, turn to best DVD Ripper for macOS Sierra), follow the guide to rip dvd for Apple TV step-by-step. For Windows users, please switch to Brorsoft DVD Ripper and insatll on your Windows (10) PC.
Here we take Mac DVD Ripper screenshot, Windows DVD Ripper share the same steps besides the tiny difference in interface.
Step 1: Load DVD
Click “Load Disc” button to load DVD discs to load your DVD movies. You can also click “IFO/ISO” icon to load your DVD ISO image files.

Tip: If you need to rip DVD with wanted subtitles and audio track, you can click the drop down menu after "Subtitles" and "Audio" to select your desired tracks. What’s more, it also offers an option called Forced subtitles, which enables you to see subtitles only when actors are speaking a different language.

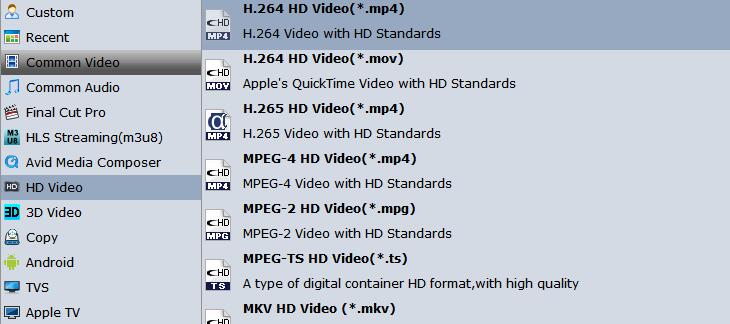
Step 2: Select an output format for Apple TV and set the output folder.
Choose the format from the “Apple TV” sublist.
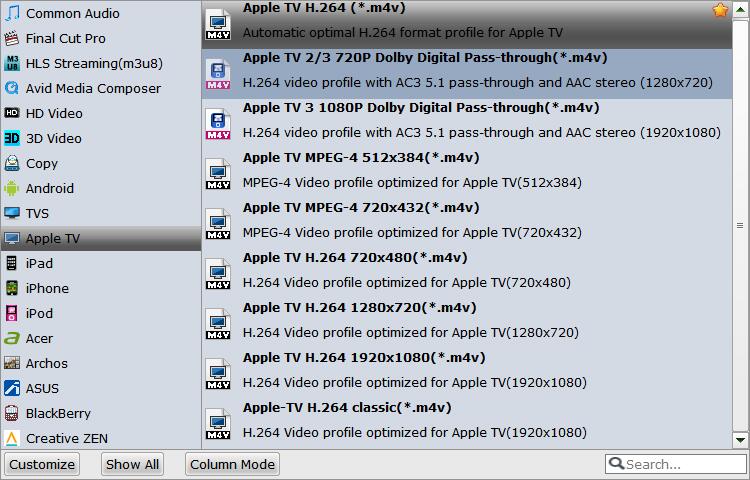
Here we recommend you to choose H.264 HD Video for you can set the AC3 5.1 surround sound. Click on the dropdown menu of “Format” and then move your pointer to “HD video > “H.264 HD Video (*.mp4)” which is the compatible format for Apple TV.
Then you can set the output folder by clicking “Browse” icon as you need.
Tips: 1. Apple TV is compatible with the following video formats:
![]() H.264 video up to 1080p, 30 frames per second, High or Main Profile level 4.0 or lower, Baseline Profile level 3.0 or lower with AAC-LC audio up to 160 Kbps per channel, 48kHz, stereo audio in .m4v, .mp4, and .mov file formats
H.264 video up to 1080p, 30 frames per second, High or Main Profile level 4.0 or lower, Baseline Profile level 3.0 or lower with AAC-LC audio up to 160 Kbps per channel, 48kHz, stereo audio in .m4v, .mp4, and .mov file formats
![]() MPEG-4 video up to 2.5 Mbps, 640 by 480 pixels, 30 frames per second, Simple Profile with AAC-LC audio up to 160 Kbps, 48kHz, stereo audio in .m4v, .mp4, and .mov file formats
MPEG-4 video up to 2.5 Mbps, 640 by 480 pixels, 30 frames per second, Simple Profile with AAC-LC audio up to 160 Kbps, 48kHz, stereo audio in .m4v, .mp4, and .mov file formats
![]() Motion JPEG (M-JPEG) up to 35 Mbps, 1280 by 720 pixels, 30 frames per second, audio in ulaw, PCM stereo audio in .avi file format
Motion JPEG (M-JPEG) up to 35 Mbps, 1280 by 720 pixels, 30 frames per second, audio in ulaw, PCM stereo audio in .avi file format
2. If you wanna edit DVD movie, you can click the “Edit” icon to edit, like cropping, trimming, adding watermark effect, deinterlacing, merging, rotating and more.
Step 3: Click “Settings” icon to adjust audio and video parameters.(Optional)
Click the “Settings” icon and you will go into a new interface named “Profile Settings”. You can adjust codec, aspect ratio, bit rate, frame rate, sample rate and audio channel in the interface according to your needs and optimize the output file quality.
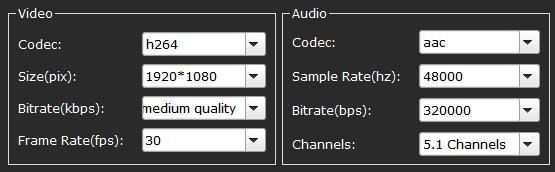
Note: Optimal settings for Apple TV should be set as Video Size: 1280*720, Video Bitrate: 4000kbps at highest quality, Video Frame rate: 24fps or 30fps, Audio codec: ac3, Audio Sampling rate: 48000hz, Audio Bitrate: 160kbps, Audio Channels: 5.1Channels.
Step 4: Start ripping DVD for Apple TV
Click the “Convert” icon, the DVD to Apple TV conversion will start immediately. You can follow the converting process in the “Conversion” interface.
When the conversion finished, you can get the output files for your Apple TV via clicking on “Open” button effortlessly. Now you can sync the converted DVD to Apple TV via iTunes, or USB flash drive.
If your are ripping the DVD on Mac, you can also directly play the RIPPED DVD movies on Mac and stream to your Apple TV via "Airplay", please carry out the following steps:
First of all, connect Widescreen television and Apple TV by the HDMI cable, and make sure your Mac accesses the Wi-Fi.
Open the 'System Preferences' of your Mac computer, and click on the 'Displays'. Then you can open the Airplay. Change the 'Airplay Mirroring' from 'Off' to '** Apple TV', and it will connect automatically. A couple of seconds later, your Mac and widescreen TV will be connected.
There is an option at the bottom of the window, you can choose to show mirroring options in the menu bar when available.
Tips & Tricks
- Play DVD on Amazon Fire TV
- Watch DVD on Nvidia Shield TV 2017
- Play DVD to TiVo Mini Vox
- Streaming DVD to Chromecast from PC
- Watch DVD on Apple TV
- Stream DVD to Roku
- Play DVD on XiaoMi Mi Box
- Rip DVD to Kodi
- Play DVD on Plex
- Play DVD on DVICO TViX HD M-6500A
- Stream DVD to Roku Ultra via Plex
- Stream DVD Movies to Apple TV 4K
- Stream DVD to MiniX Android Box
- Copy DVD to iNova TV Box for Streaming
- MKV to iTunes
- AVI to iTunes
- WMV to iTunes
- VOB to iTunes
- MP4 to iTunes
- MPG to iTunes
- FLV to iTunes
- Blu-ray to iTunes
- Best DVD Ripper for iTunes
- Copy DVD to iTunes
- Video_TS to iTunes
- 3D Blu-ray to iTunes
- FLAC to iTunes
iTunes Tips:
Social Connection
Copyright © Brorsoft Studio. All Rights Reserved.